Vegan Vanilla Buttercream Chocolates
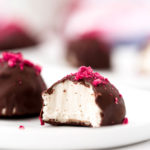
These vegan vanilla buttercream chocolates are delightfully rich. A crisp chocolate coating gives way to a fluffy, almost whipped vegan buttercream filling made from a combination of raw cashews, almond milk, coconut butter, pure maple syrup, coconut flour, vanilla, and sea salt. Feel free to dress these vegan buttercreams up with a sprinkle of crushed freeze-dried raspberries of fancy sea salt, or keep things simple with a bare chocolate coating.
Ingredients
Vanilla Buttercream Filling
- ¾ cup raw cashews, soaked for at least 2 hours (preferably overnight) and drained
- ½ to ¾ cup unsweetened almond milk or cashew milk
- ¾ cup melted coconut butter (it should be runny and pourable—see note*)
- ¼ cup plus 1 tablespoon pure maple syrup
- 1 tablespoon coconut flour**
- 1 ½ teaspoons pure vanilla extract or ½ teaspoon vanilla bean powder
- ¼ teaspoon fine grain sea salt
Chocolate Coating
- 1 cup vegan chocolate chips or chopped dark chocolate
- 1 to 2 tablespoons virgin coconut oil, as needed to thin the chocolate
Optional Toppings
- Crushed freeze-dried raspberries (pictured)
- Vegan Sprinkles
- Pretty sea salt
Instructions
For the Vanilla Buttercream Filling
- Add the soaked cashews and ½ cup of the almond milk to a high-speed blender, and blend on high until smooth, stopping to scrape down the sides as often as needed. If absolutely necessary, add as much of the remaining almond milk, 1 tablespoon at a time, as needed to blend the cashews until smooth. The texture should resemble a very thick cream.
- Add the remaining ingredients and blend for 30 seconds, or until smooth, stopping to scrape down the sides as needed.
- Scoop the filling into a shallow bowl and chill in the freezer for about 2 hours to thicken into a scoop-able texture. During the first hour of chilling, vigorously whisk every 15 minutes to create a thick, fluffy buttercream texture.
- Line a small baking tray with parchment paper.
- Use a cookie scoop*** (or small ice cream scoop) to scoop out 1 ½ tablespoon mounds of buttercream. Drop on the lined tray. You should have approximately 18 mounds, and they should resemble small scoops of vanilla ice cream. Freeze for 20 minutes to firm and set.
For the Chocolate Coating
- Meanwhile, prepare the chocolate coating. Whisk together the chocolate and coconut oil over low heat in a double-boiler or ban marie until melted, smooth, and glossy. Be careful not to overheat (or splash water into the mixture) or the chocolate will seize and take on a gritty texture.
To Assemble
- One at a time, use a fork to lower the buttercream balls into the chocolate and use a spoon to drizzle the chocolate over top and evenly coat. Shake off any excess chocolate, return to the lined tray, and sprinkle with toppings, if desired.
- Return the tray to the freezer and chill for 10 minutes, or until the chocolate sets.
- Store in an airtight container in the refrigerator for up to 1 week or in the freezer for up to 1 month. If you freeze these, be sure to pull them out about 15 to 20 minutes before serving to allow them to thaw and soften.
Notes
*I find it's easiest to make a fresh batch of homemade coconut butter and simply measure off ½ cup while it's still in a liquid state. However, store-bought coconut butter will yield a smoother icing because it's typically much smoother than homemade coconut butter. That said, store-bought coconut butter can be tricky to melt because it scorches and burns easily which leads to a seized, hardened texture. It's also WAY expensive (i.e., $14) compared to homemade, which usually only costs $2–$4 to make.
**Do not substitute the coconut flour. Coconut flour is highly absorbent, much more so than any other flour, which is why it's perfect for thickening this buttercream.
***I really, really, really recommend using a cookie scoop or small ice cream scoop for this step. If you try to use a spoon, it will be very difficult (and frustrating) to create evenly shaped mounds.